Desktop client interface overview
A tour of the NCDS desktop client main window, and what every area is for.
In this guide
After you sign in, the desktop client opens on the Main tab. The window has a menu bar and tabs across the top, a working area on the left, and a set of status panels down the right. The map below numbers each area, and the sections that follow explain what each one is for and what its controls do.
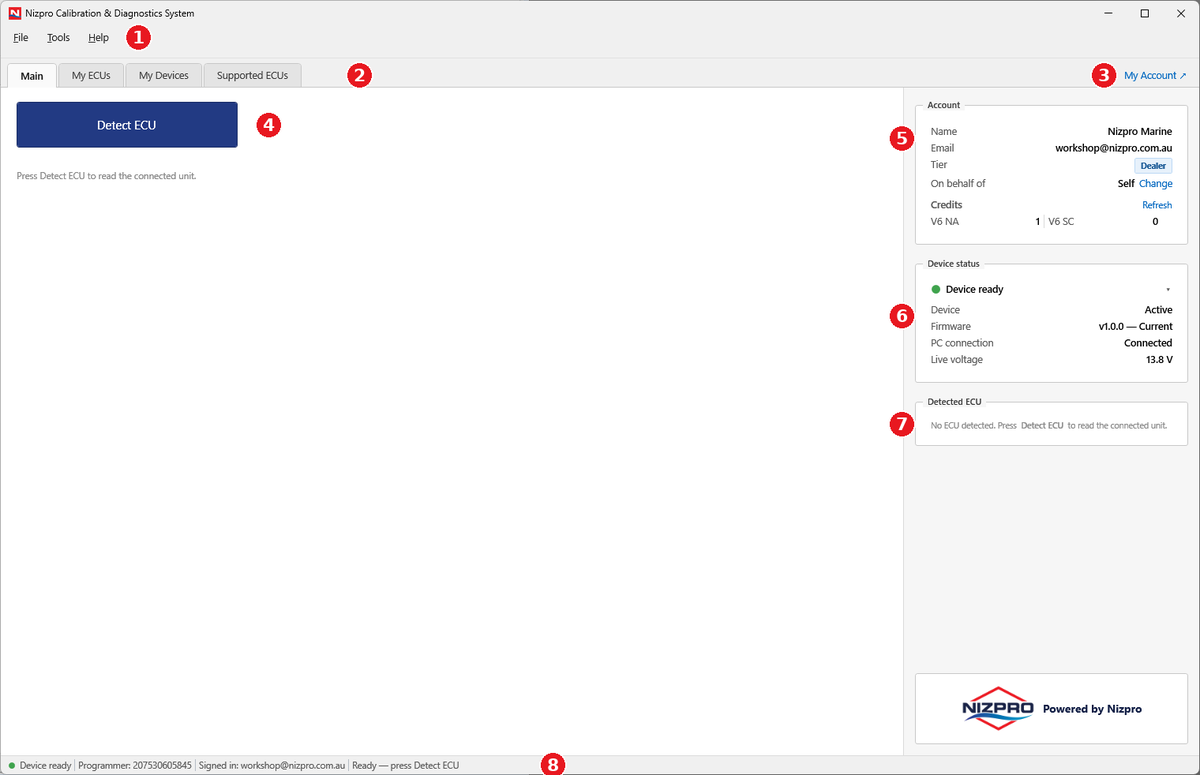
- Menu bar
- Tabs
- My Account link
- Main Panel and the primary action buttons
- Account panel
- Device status panel
- Detected ECU panel
- Status bar
1. Menu bar
Application-wide commands, grouped into three menus. Commands are enabled only when they apply to what is currently connected or detected.
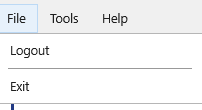
File
Logout signs you out of the current account. Exit closes the application.
Tools
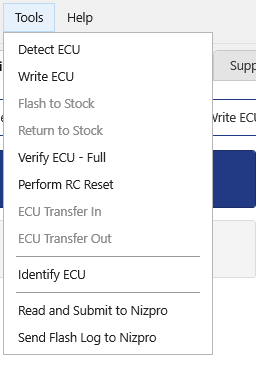
The account's full command set, each item enabled or greyed by the current state. In order: Detect ECU, Write ECU, Flash to Stock, Return to Stock, Verify ECU - Full, Perform RC Reset, ECU Transfer In, ECU Transfer Out, Identify ECU, Read and Submit to Nizpro, and Send Flash Log to Nizpro.
Two of these are worth calling out:
- Perform RC Reset: resets the Digital Electronic Control pairing for compatible ECU models. See ECU diagnostics.
- Identify ECU: reads the ECU and displays its model and licence key data. Used when requested by Nizpro.
Help
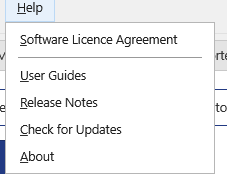
Software Licence Agreement, then User Guides, Release Notes, Check for Updates, and About. User Guides and Release Notes open the matching pages on the Nizpro website.
2. Tabs
The main sections of the client. The overview below covers what each tab is for and its controls. The detail of the tasks you run from them is in their own guides.
Main
The working area for connecting to and flashing an ECU. This is the view shown in the map above.
My ECUs
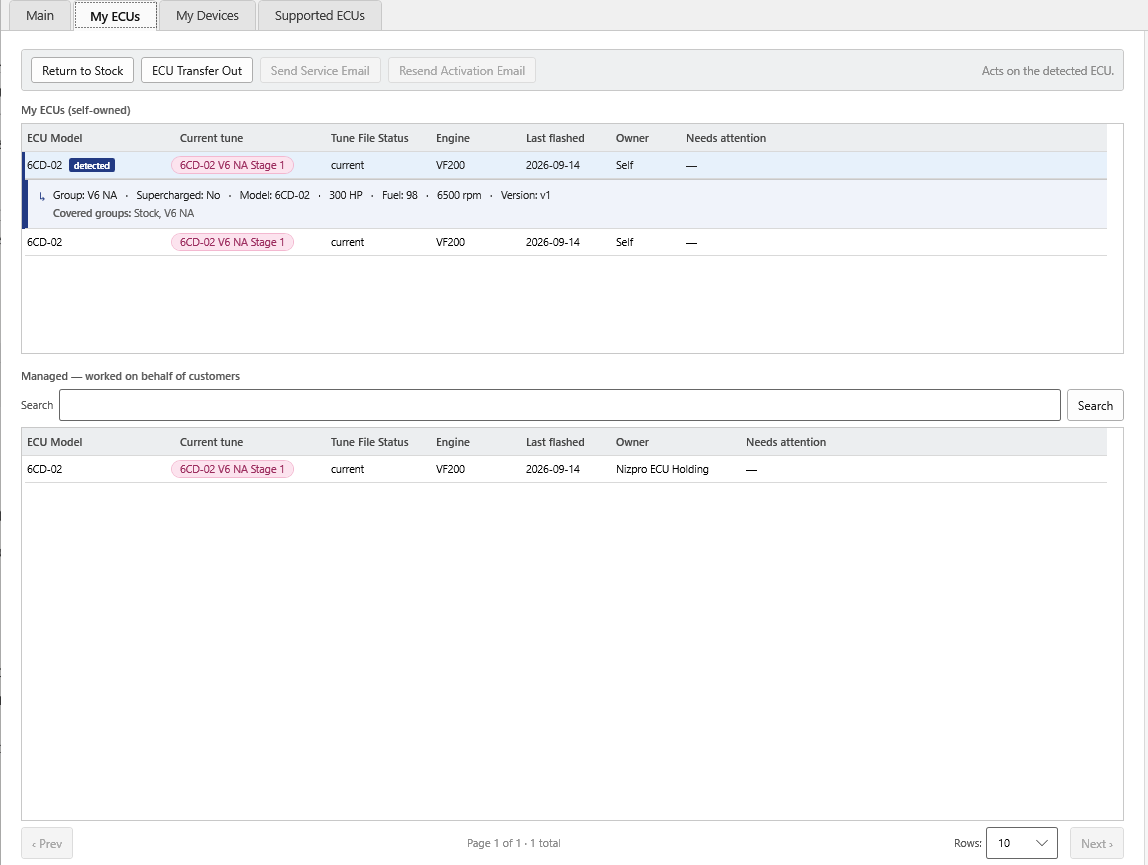
The ECUs on your account and the coverage each one has. The toolbar acts on the currently detected ECU: Return to Stock, ECU Transfer Out, Send Service Email, and Resend Activation Email. Self-owned ECUs are listed first; dealer accounts also see a Managed list of ECUs worked on for customers, with a search box. The detected ECU floats to the top with a “detected” badge and an expandable detail row. Each list has a pager for paging through longer sets.
My Devices
Your registered programmers and their status. The toolbar has Refresh and Check for Firmware Update. Each row shows whether the device is connected, its CPU serial, firmware version and whether it is current, status, and when it was registered and last seen.

Supported ECUs
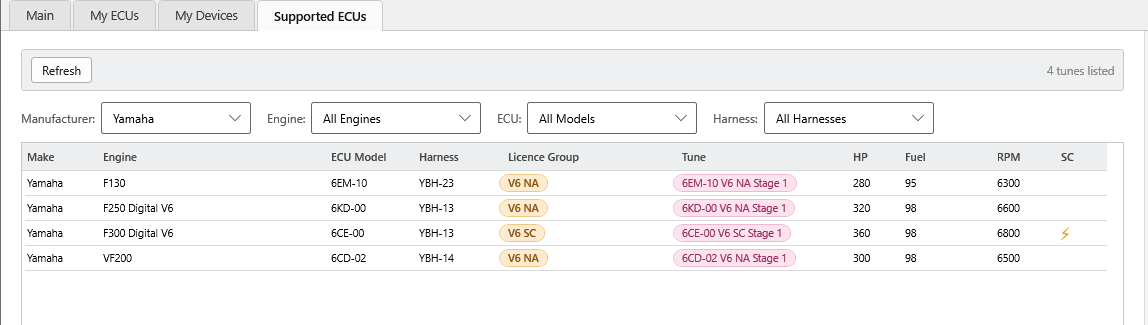
A browsable list of the ECUs and tunes NCDS supports. This tab is shown for dealer accounts. Refresh reloads the list, and the Manufacturer, Engine, ECU, and Harness dropdowns filter it. Each row shows the make, engine, ECU model, harness, licence group, tune, power and fuel figures, RPM limit, and a supercharged indicator.
3. My Account link
Opens the web portal in your browser, where you manage your account and view your ECUs, credits, and devices online. It is a link out to the portal, not a tab inside the client.
4. Main Panel and the primary action buttons
The large area on the left. On the Main tab it holds the primary action button and a short line telling you what to do next.
- When a programmer is connected and ready, Detect ECU is enabled (blue) and reads the connected unit.
- When no programmer is connected, or the programmer needs attention, the button is disabled (grey) and the line explains why, for example that you need to connect a programmer or check the Device status panel.
While it reads the ECU, a progress dialog appears. Detection reads only the ECU's identity, not the full image, so it is quick. Leave the programmer and ECU connected until it finishes. See Detecting an ECU.
Once an ECU is detected, the Main Panel shows a banner describing what was found and offers the large action buttons:
- Write ECU: start a flash on the detected ECU.
- ECU Transfer In: bring the detected ECU onto your account (DIY/Dealer) or a customer account (Dealer).
Only the button that applies to the current ECU is enabled. In the example below a new, unlicensed ECU has been detected, so Write ECU is offered.

Some actions first ask you to nominate who the ECU is for: Self, an existing customer, or a new customer. The Nominate ECU Owner dialog is shown in Flashing a tune.
The full flashing workflow (choosing a calibration, the required acknowledgements, writing, and the result) is covered in the Flashing a tune guide.
5. Account panel
Who you are signed in as, and your available credits.
- Name and Email: the signed-in account.
- Tier: your role, shown as a badge (for example Dealer).
- On behalf of: who the current work is attributed to. It is Self by default. Change lets a dealer carry out work for one of their customers.
- Credits, with Refresh: your available balance for each licence group, shown as a name and a number (for example V6 NA and V6 SC). Refresh re-checks the balance.
This panel is read-only. To edit your account, use the My Account link to open the portal.
6. Device status panel
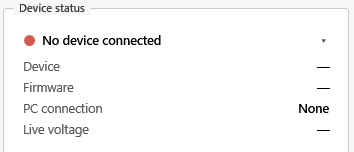
The readiness of your connected programmer. The coloured light and label give the headline state, and the lines below give the detail.
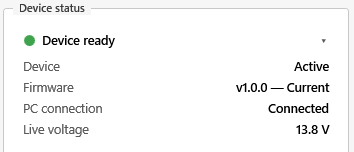
- Green (Device ready): a programmer is connected and every check has passed. You can detect and work on an ECU.
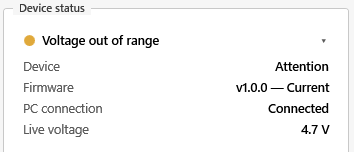
- Orange: a programmer is connected but something is not right, such as the voltage being out of range. The detail lines and the label say what needs attention.
- Red (No device connected): no programmer is connected, or there is a connection problem.
The detail lines are:
- Device: whether the programmer is active or needs attention.
- Firmware: the firmware version, and whether it is current.
- PC connection: whether the programmer is connected to this computer.
- Live voltage: the supply voltage the programmer is reading.
Voltage guide: 12 to 14 V reads as green. Below 12 V or above 14 V reads as orange and is treated as out of range. While the voltage is out of range, Detect ECU and the other on-ECU actions stay disabled, because every operation on an ECU needs the supply voltage to be in range first.
7. Detected ECU panel
Before you detect anything, this panel shows a prompt to press Detect ECU. Once an ECU is read, it shows what was found and the commands that apply to it. The example below is a licensed ECU.
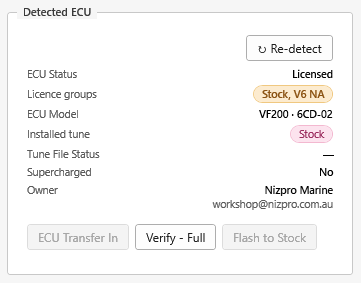
- Re-detect: reads the connected ECU again.
- ECU Status: whether the ECU is licensed. Here it reads Licensed.
- Licence groups: the categories the ECU is licensed for. Here it reads Stock, V6 NA.
- ECU Model: the identified model. Here VF200 · 6CD-02.
- Installed tune: what is currently on the ECU. Here Stock, which for a licensed ECU means it has been flashed back to stock.
- Tune File Status: a read-only flag for the installed tune, reading current, superseded (a newer version exists), experimental (a registered custom or development calibration), or deprecated (withdrawn as a safety recall). It shows a dash when it does not apply, such as when the installed tune is Stock, as here. Informational only.
- Supercharged: whether the tune is for a supercharged engine, shown as Yes or No. Here No.
- Owner: the ECU's owner on the system. Here Nizpro Marine.
The command buttons across the bottom act on the detected ECU, and only those valid for its current state are enabled:
- ECU Transfer In: bring this ECU onto your account. It is greyed here because the ECU is already on this account.
- Verify - Full: run a full read-only integrity check.
- Flash to Stock: write the stock calibration while keeping the licence. It is greyed here because the ECU has already been flashed to stock.
8. Status bar
The strip along the bottom of the window gives an at-a-glance summary: the readiness light and label, the connected programmer serial number, the account you are signed in as, and a short status message telling you what to do next.